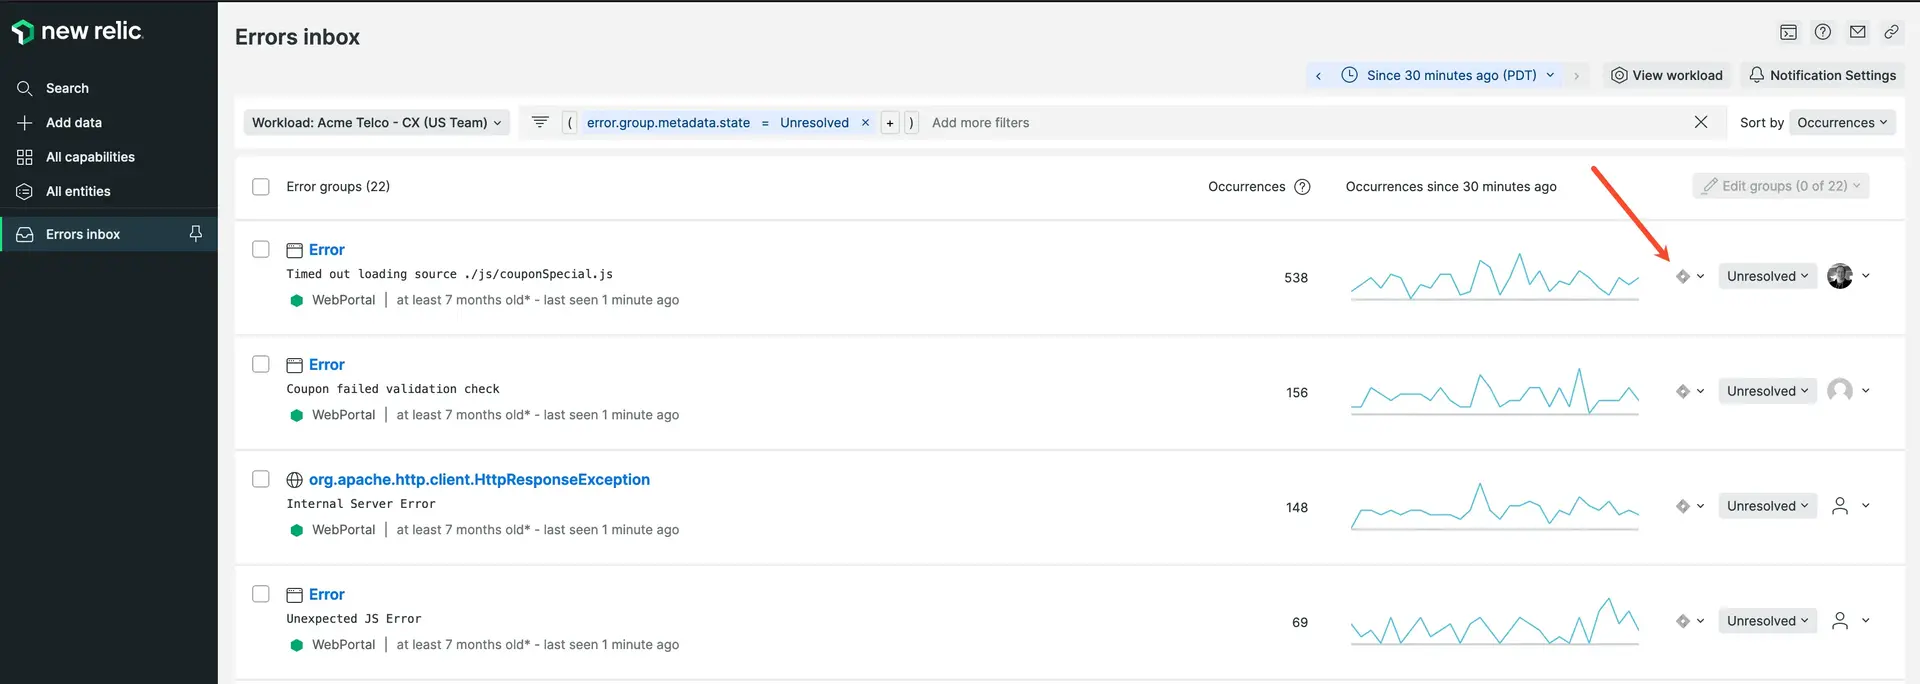
Bring errors inbox closer to your teams tooling and workflows by connecting it to external services such as Slack, Jira, and CodeStream.
Connect an inbox to Slack
When an inbox is connected to Slack, new and resurfaced error groups are sent to a Slack channel moments after they occur. This enables your team to quickly identify any new errors or regressions and resolve them quickly with direct links to the stack trace. To reduce noise, notifications are not sent for expected errors.
To connect an inbox to Slack either follow the steps below or follow along with the video:
- If your Slack workspace does not have the New Relic app installed, do that first.
- Open one of your New Relic error inboxes, select the Notification Settings icon (looks like a bell) in the top right corner.
- Toggle the Slack button to on if it is off.
- If no workspaces are available, click the plus button to enable Slack with a one click Slack authentication.
- Once authenticated, you will be able to select a Workspace and specific Channel to send notifications to.
- Click Test to ensure messages are being sent to the right channel.
Connect errors inbox to CodeStream
To use CodeStream's Open in IDE integration with your stack trace errors, you should associate repositories with your services and associate build SHAs or release tags with errors. Learn more about commit SHAs and release tags.
Once set up, you can jump from an error group directly to the offending code in your IDE by clicking the Open in IDE button.
Connect an inbox to Jira
Connect errors inbox to Jira to easily create tickets for your errors. Jira templates allow you to quickly create a ticket containing error details and links directly to the stack trace and for quick access and resolution.

We store a link to the the ticket alongside the associated error group for 13 months. If the error occurs again within that period, you can easily access associated tickets.
Importante
New Relic supports both team-managed and company-managed Atlassian-Jira projects.
To connect an inbox to Jira either follow the steps below or follow along with the video:
- Click on the Jira integration icon on the far right side of the error group you want to connect to Jira.
- If you don’t already have a connection to Jira set up in your account, click Add JIRA Workspace from the dropdown. Fill in all the fields and click Test connection before saving to ensure that your details are correct.
- Next, set up a template. Templates determine what information will be sent to Jira. Find more information about specific fields here. Errors inbox does not currently support two-way communication with Jira, but you can select this option in case it is supported in the future.
- Once you have a template, click Send test notification to preview what the ticket looks like in Jira. If the preview looks good, click Update message to save the template. Note that a test notification will create a Jira ticket in your Jira workspace.
- Now your team can create Jira tickets by clicking the Jira integration icon on the far right side of the error group and selecting a template.
Jira settings are associated with the account that owns the error group or entity. If you are using the cross-account errors inbox, you will need to set up a Jira connection multiple times.
Template variables for Jira integration
Template variables that can be used in the Jira integration template:
- errorGroup.id
- errorGroup.accountId
- errorGroup.sourceEventType
- errorGroup.name
- errorGroup.message
- errorGroup.state
- errorGroup.link
- errorGroup.firstSeen
- errorGroup.lastSeen
- errorGroup.count
- entity.id
- entity.name
- entity.link
Remove a Jira workspace and/or template
Here's how to remove a workspace or template:
Go to one.newrelic.com > All capabilities > Alerts > Destinations.
On the right side of the screen, select Destinations.
Search for your Jira destination, and at the right side of that row, select the ... icon, and then click Delete destination.
