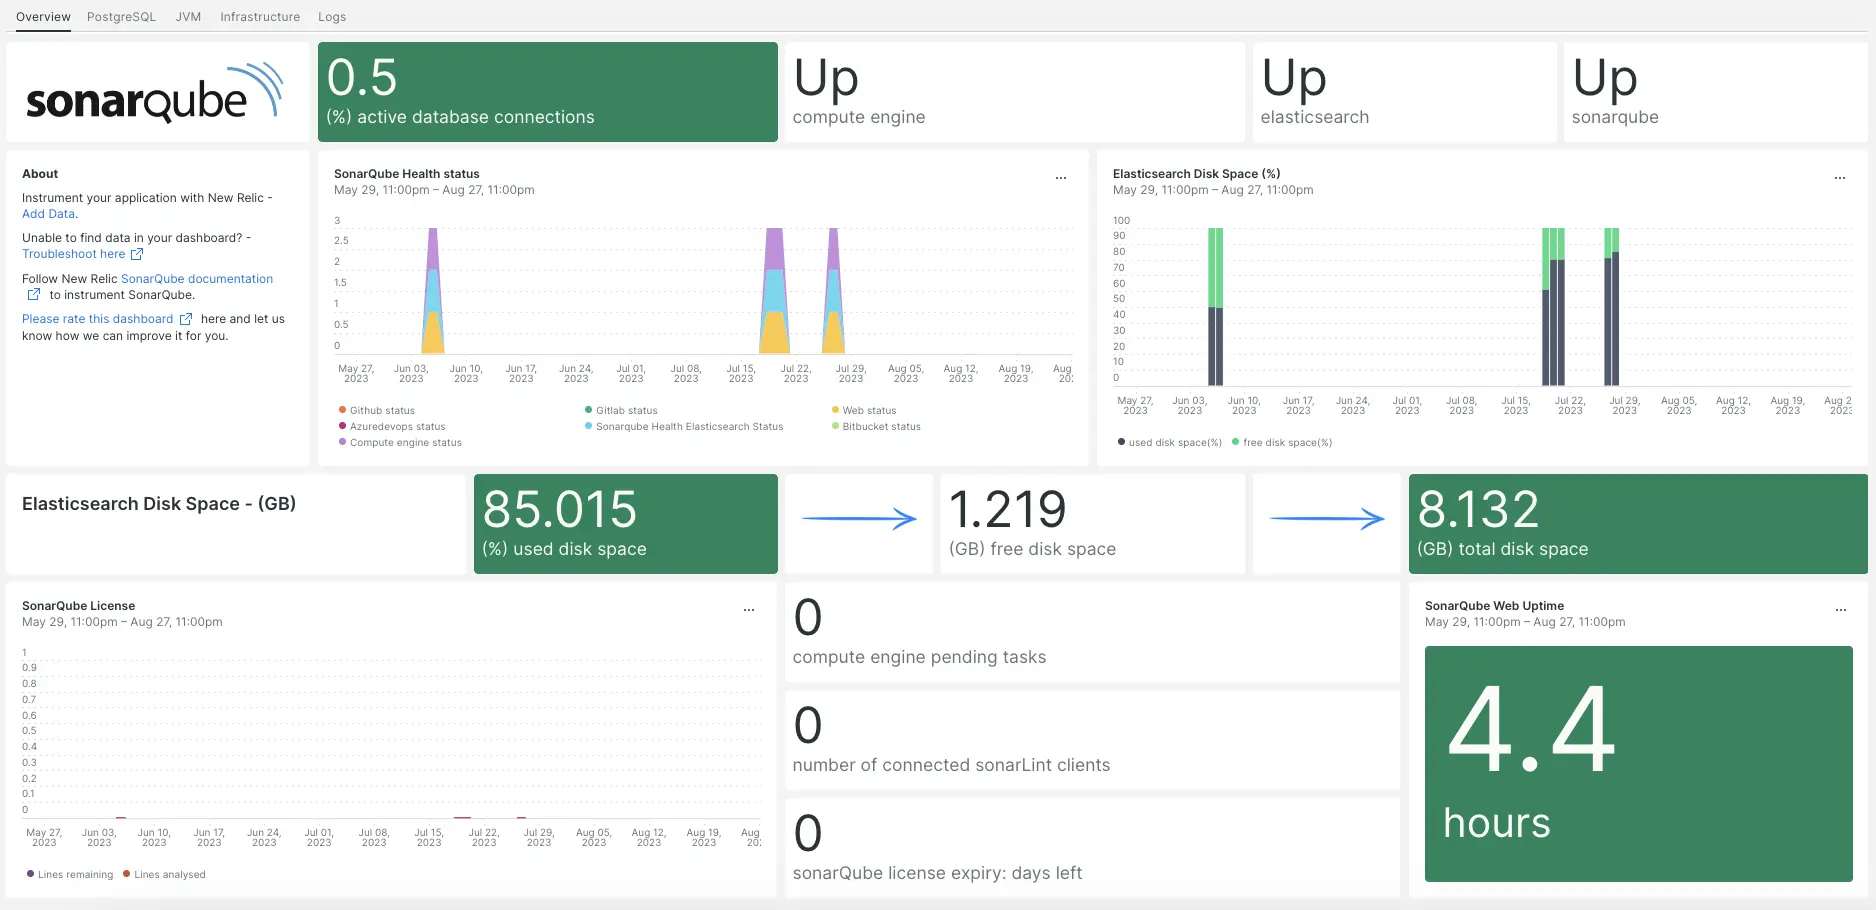
SonarQube 통합은 SonarQube 애플리케이션의 성능을 모니터링하여 코드를 진단하고 최적화하는 데 도움을 줍니다. SonarQube 통합은 포스 에이전트, PosgreSQL 통합, NRI-Prometheus 및 NRI-JMX를 활용하고 가장 중요한 SonarQube 지표가 포함된 사전 구축된 대시보드를 제공합니다.

SonarQube 통합을 설정한 후 SonarQube 지표에 대한 대시보드를 제공합니다.
인프라 에이전트 설치
SonarQube 통합을 사용하려면 먼저 동일한 호스트에 인프라 에이전트를 설치 해야 합니다. 모든 온호스트 통합에는 지표를 뉴렐릭에 노출하고 보고하는 데 도움이 되는 베어링 에이전트가 필요합니다.
PostgreSQL 통합 설치
SonarQube 통합을 사용하려면 먼저 PostgreSQL 통합을 설치해야 합니다.
통합을 설치하기 전에 설명서 에서 PostgreSQL 통합 요구 사항을 확인하세요. 호환성을 확인한 후 이 문서로 돌아오세요.
PostgreSQL 빠른 시작 페이지 열기 PostgreSQL 빠른 시작 설치.
PostgreSQL 퀵스타트 설치를 시작하려면
Install now
클릭하세요.
NRI-Prometheus 구성
다음 명령을 실행하여 NRI-Prometheus 구성 파일을 생성합니다.
bash$touch /etc/newrelic-infra/integrations.d/nri-prometheus-config.yml새 구성 파일에 다음 스니펫을 붙여넣으세요. 관련 필드로
cluster_name및urls를 업데이트해야 합니다.integrations:- name: nri-prometheusconfig:# When standalone is set to false nri-prometheus requires an infrastructure agent to work and send data. Defaults to truestandalone: false# When running with infrastructure agent emitters will have to include infra-sdkemitters: infra-sdk# The name of your cluster. It's important to match other New Relic products to relate the data.cluster_name: "YOUR_CLUSTER_NAME"targets:- description: Sonarqube metrics listurls: ["http://user_name:password@YOUR_HOST_IP:9000/api/monitoring/metrics"]# tls_config:# ca_file_path: "/etc/etcd/etcd-client-ca.crt"# cert_file_path: "/etc/etcd/etcd-client.crt"# key_file_path: "/etc/etcd/etcd-client.key"# Whether the integration should run in verbose mode or not. Defaults to falseverbose: false# Whether the integration should run in audit mode or not. Defaults to false.# Audit mode logs the uncompressed data sent to New Relic. Use this to log all data sent.# It does not include verbose mode. This can lead to a high log volume, use with careaudit: false# The HTTP client timeout when fetching data from endpoints. Defaults to 30s.# scrape_timeout: "30s"# Length in time to distribute the scraping from the endpointsscrape_duration: "5s"# Number of worker threads used for scraping targets.# For large clusters with many (>400) endpoints, slowly increase until scrape# time falls between the desired `scrape_duration`.# Increasing this value too much will result in huge memory consumption if too# many metrics are being scraped.# Default: 4# worker_threads: 4# Whether the integration should skip TLS verification or not. Defaults to falseinsecure_skip_verify: truetimeout: 10s
JMX 통합 설치 및 구성
SonarQube 통합을 사용하려면 JMX 모니터링 통합도 설치 해야 합니다. JMX 통합은 SonarQube 데이터를 스크랩하며, 나중에 이를 대시보드 및 쿼리 가능한 데이터로 전환합니다.
다음 코드 스니펫을
/opt/sonarqube/conf/sonar.properties에 추가하세요.# SonarQube Web Server JMX configuration.sonar.web.javaOpts=-Dcom.sun.management.jmxremote \-Dcom.sun.management.jmxremote.port=9010 \-Dcom.sun.management.jmxremote.authenticate=false \-Dcom.sun.management.jmxremote.ssl=false# SonarQube Compute Engine JMX configuration.sonar.ce.javaOpts=-Dcom.sun.management.jmxremote \-Dcom.sun.management.jmxremote.port=9011 \-Dcom.sun.management.jmxremote.authenticate=false \-Dcom.sun.management.jmxremote.ssl=false다음 코드 스니펫을
/etc/newrelic-infra/integrations.d/jvm-sonarqube-web-metrics.yml/에 추가하세요.collect:- domain: SonarQubeevent_type: JVMSampleSonarQubeWebMetricsbeans:- query: name=AsyncExecutionattributes:- QueueSize- WorkerCount- LargestWorkerCount- query: name=Databaseattributes:- MigrationStatus- PoolActiveConnections- PoolMaxActiveConnections- PoolIdleConnections- PoolMaxIdleConnections- PoolMinIdleConnections- PoolInitialSize- PoolMaxWaitMillis- PoolRemoveAbandoned- PoolRemoveAbandonedTimeoutSeconds- query: name=SonarQubeattributes:- Version- ServerId- LogLevel다음 코드 스니펫을
/etc/newrelic-infra/integrations.d/jvm-sonarqube-compute-engine-metrics.yml에 추가하세요.collect:- domain: SonarQubeevent_type: JVMSampleSonarQubeComputeEngineMetricsbeans:- query: name=ComputeEngineDatabaseConnectionattributes:- PoolInitialSize- PoolActiveConnections- PoolMaxActiveConnections- PoolIdleConnections- PoolMaxIdleConnections- PoolMinIdleConnections- PoolMaxWaitMillis- PoolRemoveAbandoned- PoolRemoveAbandonedTimeoutSeconds- query: name=ComputeEngineTasksattributes:- PendingCount- LongestTimePending- InProgressCount- ErrorCount- SuccessCount- ProcessingTime- WorkerMaxCount- WorkerCount- WorkerUuids- EnabledWorkerUuids다음 코드 스니펫을
/etc/newrelic-infra/integrations.d/jmx-sonarqube-compute-engine-config.yml에 추가하세요.integrations:- name: nri-jmxenv:COLLECTION_FILES: /etc/newrelic-infra/integrations.d/jvm-sonarqube-compute-engine-metrics.ymlJMX_HOST: <YOUR_HOST>JMX_PASS: adminJMX_PORT: 9010JMX_USER: adminCONNECTION_URL: service:jmx:rmi://<YOUR_IP>:9010/jndi/rmi://<YOUR_IP>:9010/jmxrmiREMOTE_MONITORING: "true"interval: 15slabels:env: staging다음 코드 스니펫을
/etc/newrelic-infra/integrations.d/jmx-sonarqube-web-config.yml에 추가하세요.integrations:- name: nri-jmxenv:COLLECTION_FILES: /etc/newrelic-infra/integrations.d/jvm-sonarqube-web-metrics.ymlJMX_HOST: <YOUR_HOST>JMX_PASS: adminJMX_PORT: 9011JMX_USER: adminCONNECTION_URL: service:jmx:rmi://<YOUR_IP>:9011/jndi/rmi://<YOUR_IP>:9011/jmxrmiREMOTE_MONITORING: "true"interval: 15slabels:env: staging
New Relic에 SonarQube 로그 전달
SonarQube 로그를 뉴렐릭으로 전달하려면 다음 단계를 따르세요.
다음 경로에
logging.yml이라는 로그 파일을 생성합니다.bash$cd /etc/newrelic-infra/logging.dlogging.yml파일에 다음 스크립트를 추가합니다.logs:- name: sonar_logsfile: /opt/sonarqube/logs/sonar.logattributes:logtype: sonar_logs- name: ce_logsfile: /opt/sonarqube/logs/ce.logattributes:logtype: sonar_ce_logs- name: es_logsfile: /opt/sonarqube/logs/es.logattributes:logtype: sonar_es_logs- name: web_logsfile: /opt/sonarqube/logs/web.logattributes:logtype: sonar_web_logs
New Relic 인프라 에이전트 다시 시작
인프라 에이전트를 다시 시작합니다.
$sudo systemctl restart newrelic-infra.service몇 분 안에 애플리케이션이 메트릭을 one.newrelic.com 으로 보냅니다.
데이터 찾기
SonarQube 애플리케이션 메트릭을 모니터링하기 위해 SonarQube 이라는 사전 빌드된 대시보드 템플릿을 선택할 수 있습니다. 사전 구축된 대시보드 템플릿을 사용하려면 다음 단계를 따르세요.
one.newrelic.com 에서,
+ Integrations & Agents
페이지로 이동하세요.
Dashboards
을 클릭합니다.
검색창에
sonarqube를 입력합니다.SonarQube 대시보드가 나타납니다. 그것을 클릭하여 설치하십시오.
귀하의 SonarQube 대시보드는 맞춤형 대시보드로 간주되며 Dashboards UI 에서 찾을 수 있습니다. 대시보드 사용 및 편집에 대한 문서는 대시보드 문서 를 참조하세요.
다음은 Postfix 데이터에 대한 몇 가지 NRQL 쿼리 예입니다.
다음은 뭐지?
NRQL 쿼리 작성 및 대시보드 생성에 대해 자세히 알아보려면 다음 문서를 확인하세요.
- 기본 및 고급 쿼리를 생성 하기 위한 쿼리 빌더 소개
- 대시보드를 사용자 지정하고 다양한 작업을 수행하기 위한 대시보드 소개
- 대시보드를 관리하여 대시 보드 표시 모드를 조정하거나 대시보드에 더 많은 콘텐츠를 추가합니다.